- It is added after Honeycomb 11.
- It is always associated with an Activity.
- We can use more than one fragment.
- It has its own layout and behavior.
- It has its own life cycle.
- It can be added or removed at run time.
- Multiple fragments can be combined in a single activity.
- It can be used in multiple activities.
Understanding the Concept of Fragments
In Android development, fragments are modular sections of an activity that assist in creating flexible, auto-adjustable UI designs. They help to ensure UI flexibility across various device screen sizes, which significantly enhances the user experience and adaptability of the application.
Fragments are often referred to as "sub-activities" as they are inherently dependent on the lifecycle of the host activity. Hence, a fragment's operations cease when the host activity is paused.
Fragments can be dynamically added, removed, or replaced while the activity is running, offering a high degree of flexibility and adaptability to the app.
Types of Android Fragments
Android fragments can be classified into three major types:
- Single Fragment: This type showcases a single view on the device screen. It's commonly utilized for mobile phones.
- List Fragment: List Fragments display a list-view, letting the user select the desired sub-activity. The menu drawer in apps like Gmail is a prime example of this type of fragment.
- Fragment Transaction: These fragments support the transition from one fragment to another at runtime. Users can switch between multiple fragments, much like switching tabs.
Diving into the Android Fragment Lifecycle
The Android Fragment Lifecycle consists of several states that a fragment transitions through as it is added, removed, or interacts with the user within an activity. Each state corresponds to a specific operation or functionality in the lifecycle. By understanding these states and their corresponding operations, you can tailor your fragments to function optimally within their host activity.

Key Methods in the Android Fragment Lifecycle
The Android Fragment Lifecycle is composed of several key methods that correspond to different lifecycle states. These methods include:
onAttach(): This method signals that the fragment has been attached to an activity. It is the first method to be called, even beforeonCreate().onCreateView(): This method is invoked when the fragment is about to draw its UI for the first time. The method should return a View component, which forms the root of the fragment's layout.onViewCreated(): This method is called after theonCreateView()method. It helps to configure the resulting views, such as setting up an adapter on a ListFragment.onActivityCreated(): This method is triggered after bothonCreate()andonCreateView(), indicating that the activity'sonCreate()has completed.onStart(): This method is called once the fragment becomes visible to the user.onPause(): This method is the first indication that the user is leaving the fragment. It's where you should commit any changes that should persist beyond the current user session.onStop(): This method is called to terminate the functioning and visibility of the fragment from the user's screen.onDestroyView(): This method is called to clean up all resources as well as view hierarchy associated with the fragment.onDestroy(): This method is called to perform the final clean up of the fragment's state and its lifecycle.onDetach(): This method is invoked to disassociate the fragment from its host activity.
Creating Android Fragments
Fragments are always embedded in activities, which means they are added to the layout of the activity in which they reside. Multiple fragments can be added to one activity, either statically or dynamically.
- Statically: The fragment is explicitly mentioned in the XML file of the activity. However, such fragments cannot be replaced during runtime.
- Dynamically: The
FragmentManageris used to embed fragments with activities. This allows the addition, deletion, or replacement of fragments at runtime, thereby improving the user experience.
Working with the Fragment Manager
The FragmentManager is responsible for managing the lifecycle of its fragments. It handles operations like adding fragments to their host activity and detaching them when they are no longer in use.
The Fragment class includes callback methods that correspond to the changes in a fragment's lifecycle. These include onCreate(), onStart(), onResume(), onPause(), onStop(), and onDestroy().
The Fragment Lifecycle and the Fragment Manager
When a fragment is instantiated, it begins in the INITIALIZED state. For a fragment to transition through the rest of its lifecycle, it must be added to a FragmentManager. The FragmentManager determines what state its fragment should be in and moves them into that state.
Beyond managing the fragment lifecycle, the FragmentManager is also responsible for attaching fragments to their host activity and detaching them when the fragment is no longer in use.
Fragment Lifecycle States and Callbacks
The FragmentManager takes several factors into account when determining a fragment's lifecycle state:
- A fragment's maximum state is determined by its
FragmentManager. A fragment cannot progress beyond the state of itsFragmentManager. - As part of a
FragmentTransaction, you can set a maximum lifecycle state on a fragment usingsetMaxLifecycle(). - A fragment's lifecycle state can never be greater than its parent. For instance, a parent fragment or activity must be started before its child fragments. Similarly, child fragments must be stopped before their parent fragment or activity.
Transitioning Through Fragment Lifecycle States
As a fragment progresses through its lifecycle, it moves upward and downward through its states. For example, a fragment that is added to the top of the back stack moves upward from CREATED to STARTED to RESUMED. Conversely, when a fragment is popped off the back stack, it moves downward through those states, going from RESUMED to STARTED to CREATED, and finally DESTROYED.
SOME IMPORTANT TERMS:-
Fragmentmanager
A FragmentManager manages Fragments in Android, specifically it handles transactions between fragments. A transaction is a way to add, replace, or remove fragments.
FragmentTransaction
FragmentTransaction gives us methods to add, replace, or remove fragments in Android. It gives us an interface for interacting with fragments.
addToBackStack(null)
The method, addToBackOfStack(String name), adds this transaction to the back stack, this can be used so that Fragments are remembered and can be used again by the Activity
Read More : Android Runtime Permissions with Dexter Library
Let's create an application using Fragment:-
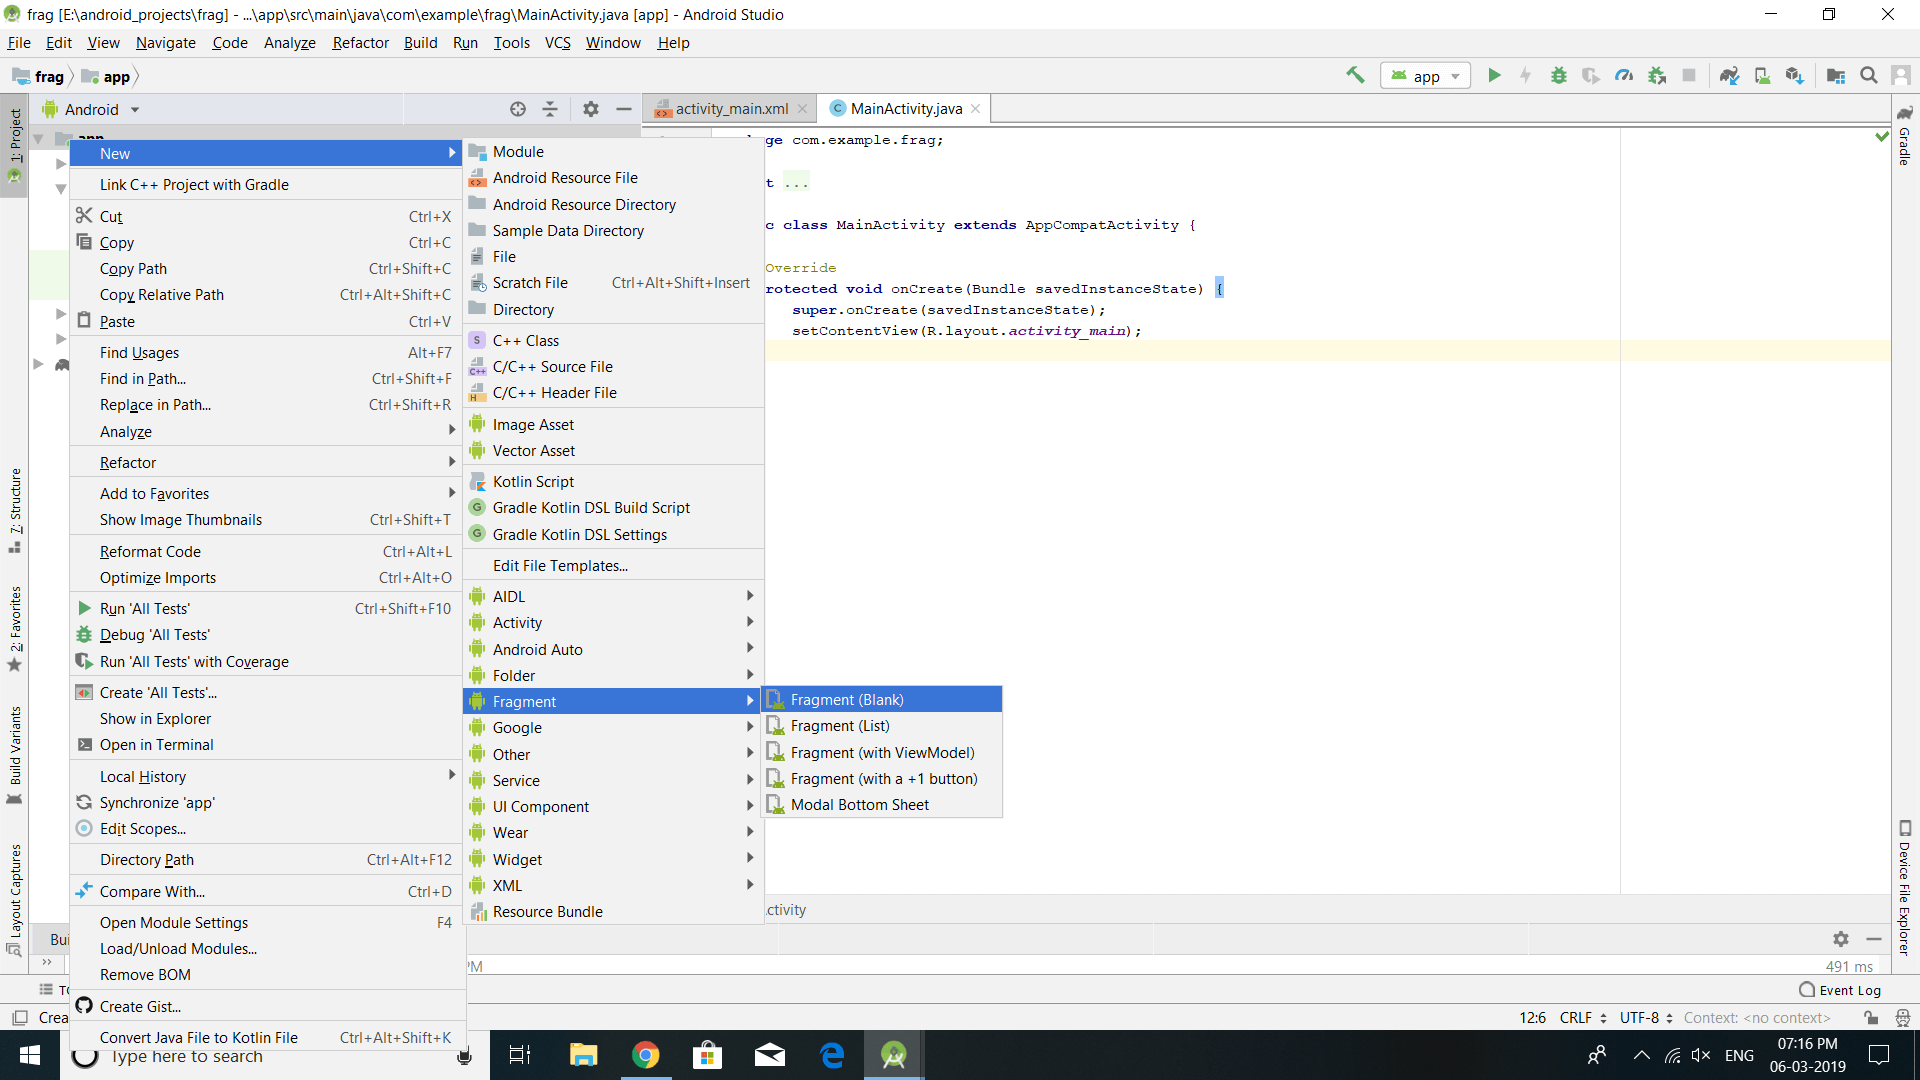
1. Create a new fragment frag1 by Right click on App>select New>select Fragment>select Fragment (Blank). It will automatically create its JAVA and corresponding XML file.
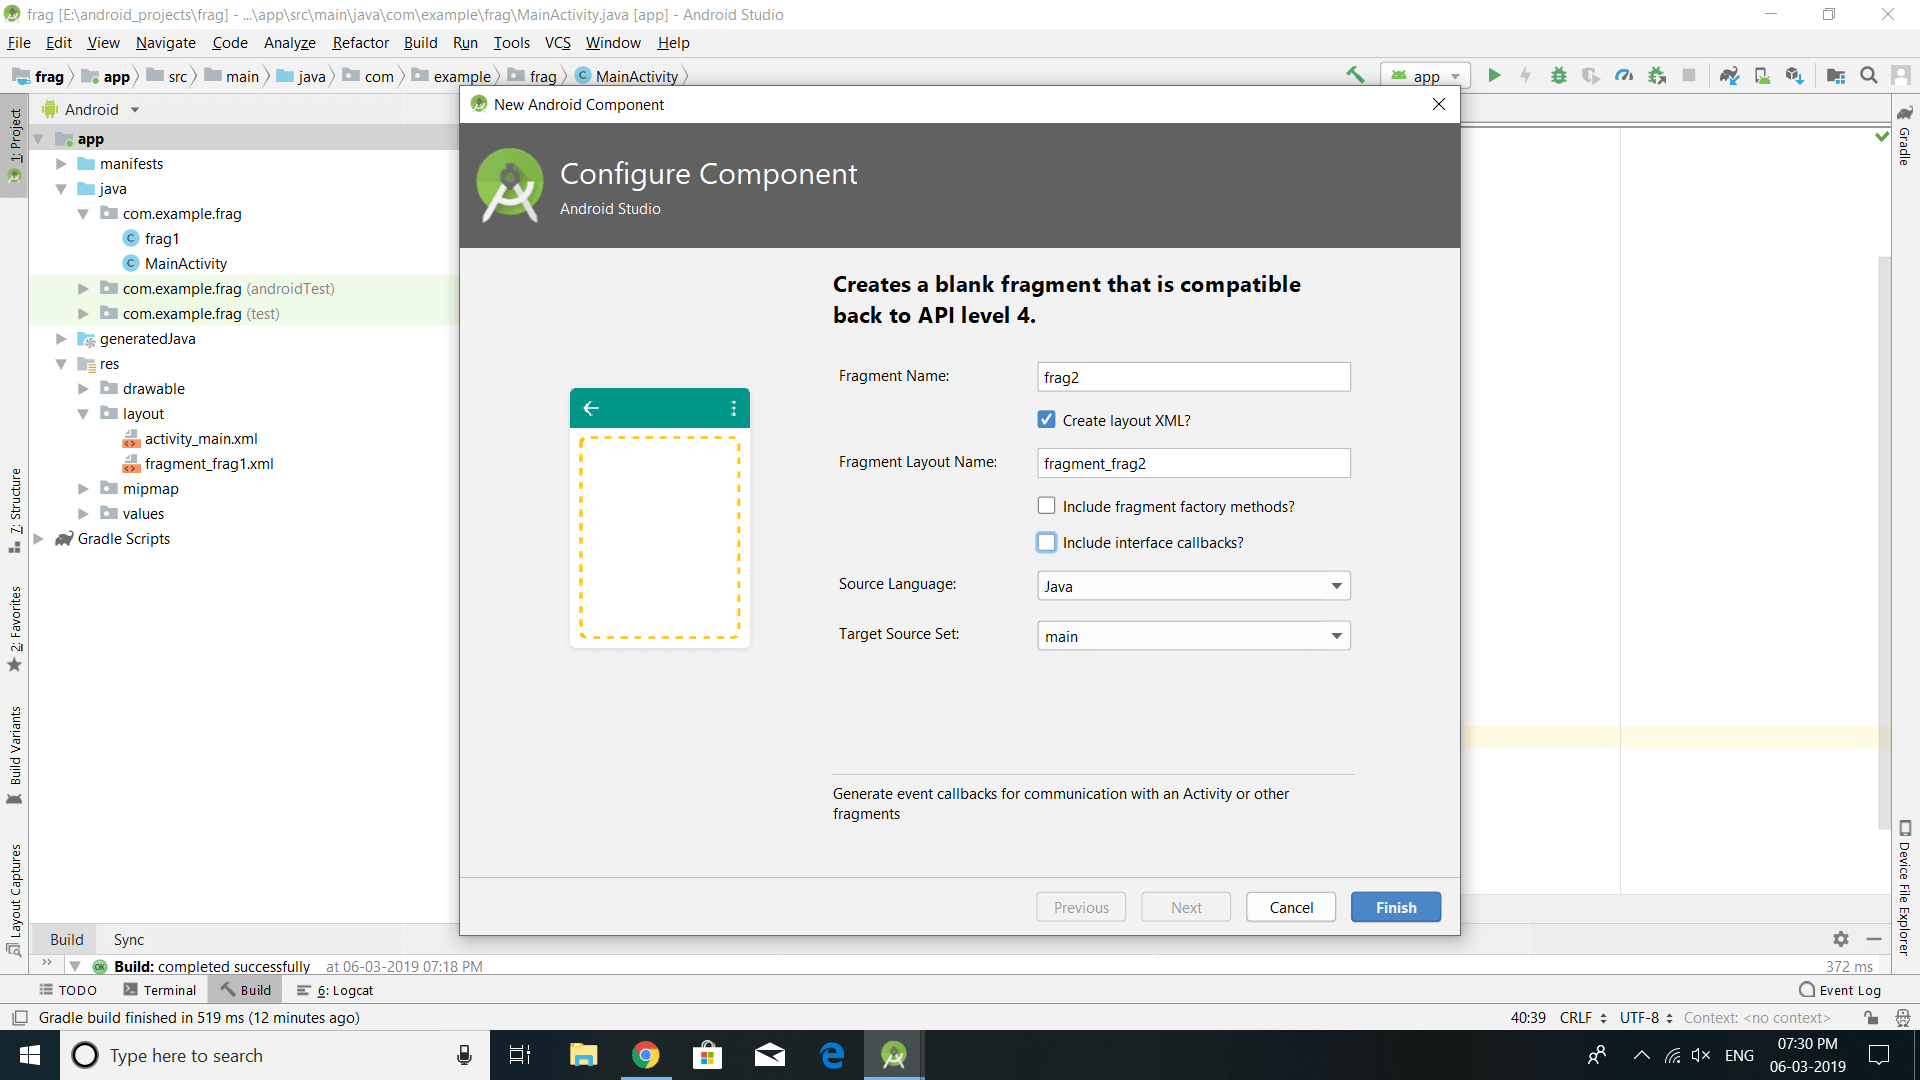
2. Create another fragment frag2 using same procedure of above


3. Open the fragment_frag1.xml and copy the below the code.
xml version="1.0" encoding="utf-8"?>
<FrameLayout xmlns:android="http://schemas.android.com/apk/res/android"
    xmlns:tools="http://schemas.android.com/tools"
    android:layout_width="match_parent"
    android:layout_height="match_parent"
    tools:context=".frag1"
    android:background="@color/colorPrimary">


    <TextView
        android:layout_width="match_parent"
        android:layout_height="match_parent"
        android:text="fragment 1"
        android:textSize="50dp"
        android:textColor="#ffffff"
         android:gravity="center"/>

FrameLayout>
4. Open the fragment_frag2.xml file and follow the below code. In this fragment, we have given red colour.
xml version="1.0" encoding="utf-8"?>
<FrameLayout xmlns:android="http://schemas.android.com/apk/res/android"
    xmlns:tools="http://schemas.android.com/tools"
    android:layout_width="match_parent"
    android:layout_height="match_parent"
    tools:context=".frag2"
    android:background="@color/colorAccent">


    <TextView
        android:layout_width="match_parent"
        android:layout_height="match_parent"
        android:text="fragment 2"
        android:textColor="#ffffff"
        android:textSize="50dp"
        android:gravity="center"
        />

FrameLayout>
5. Frag1.java
package com.example.frag;

import android.os.Bundle;
import android.support.v4.app.Fragment;
import android.view.LayoutInflater;
import android.view.View;
import android.view.ViewGroup;

public class frag1 extends Fragment {


    public frag1() {
        // Required empty public constructor
    }

    @Override
    public View onCreateView(LayoutInflater l, ViewGroup container,
                             Bundle savedInstanceState) {
        // Inflate the layout for this fragment
        View v= l.inflate(R.layout.fragment_frag1, container, false);
        return  v;
    }
}
6. frag2.java
package com.example.frag;

import android.os.Bundle;
import android.support.v4.app.Fragment;
import android.view.LayoutInflater;
import android.view.View;
import android.view.ViewGroup;

public class frag2 extends Fragment {
    public frag2() {
        // Required empty public constructor
    }

    @Override
    public View onCreateView(LayoutInflater inflater, ViewGroup container,
                             Bundle savedInstanceState) {
        // Inflate the layout for this fragment
        View v=inflater.inflate(R.layout.fragment_frag2, container, false);
        return v;
    }
}
7. This is main screen of our page, open activity_main.xml and copy the below code.
xml version="1.0" encoding="utf-8"?>

<LinearLayout xmlns:android="http://schemas.android.com/apk/res/android"
    xmlns:app="http://schemas.android.com/apk/res-auto"
    xmlns:tools="http://schemas.android.com/tools"
    android:layout_width="match_parent"
    android:layout_height="match_parent"
    tools:context=".MainActivity"
    android:orientation="vertical">

    <TextView
        android:layout_width="wrap_content"
        android:layout_height="wrap_content"
        android:text="FRAGMENT TUTORIAL"
        android:textSize="30dp"
        android:textColor="@color/colorPrimary"/>

    <fragment
        android:id="@+id/f1"
        android:layout_width="match_parent"
        android:layout_height="300dp"
        class="com.example.frag.frag2"
        android:layout_margin="30dp"/>

    <Button
        android:id="@+id/add"
        android:layout_width="match_parent"
        android:layout_height="wrap_content"
        android:text="ADD A FRAGMENT"
        android:onClick="add"/>
    <Button
        android:id="@+id/delete"
        android:layout_width="match_parent"
        android:layout_height="wrap_content"
        android:text="DELETE A FRAGMENT"
        android:onClick="delete"/>
    <Button
        android:id="@+id/replace"
        android:layout_width="match_parent"
        android:layout_height="wrap_content"
        android:text="REPLACE A FRAGMENT"
        android:onClick="replace"/>

LinearLayout>

8. In the main activity, we will create three buttons: ADD A FRAGMENT, DELETE A FRAGMENT, REPLACE A FRAGMENT.
package com.example.frag;

import android.support.v4.app.FragmentActivity;
import android.support.v4.app.FragmentManager;
import android.support.v4.app.FragmentTransaction;
import android.support.v7.app.AppCompatActivity;
import android.os.Bundle;
import android.view.View;
import android.widget.Toast;

public class MainActivity extends AppCompatActivity {

    @Override
    protected void onCreate(Bundle savedInstanceState) {
        super.onCreate(savedInstanceState);
        setContentView(R.layout.activity_main);
    }

    public void add(View v)
    {

            FragmentManager fm=getSupportFragmentManager();
            FragmentTransaction ft=fm.beginTransaction();
            ft.add(R.id.f1,new frag1());
            Toast.makeText(this, "Fragment is added!!!!!!", Toast.LENGTH_SHORT).show();
            ft.addToBackStack(null);
            ft.commit();
    }

    public void delete(View v)
    {

        FragmentManager fm=getSupportFragmentManager();
        FragmentTransaction ft=fm.beginTransaction();
        if(fm.getBackStackEntryCount()>0) {
            fm.popBackStack();
            Toast.makeText(this, "Fragment is deleted!!!!!!", Toast.LENGTH_SHORT).show();
        }

        ft.commit();
    }

    public void replace(View v)
    {

        FragmentManager fm=getSupportFragmentManager();
        FragmentTransaction ft=fm.beginTransaction();
        ft.replace(R.id.f1,new frag2());
        Toast.makeText(this, "Fragment is replaced!!!!!!", Toast.LENGTH_SHORT).show();
        ft.addToBackStack(null);
        ft.commit();
    }
}
THREE FRAGMENTS IN ANDROID
1. TO ADD A FRAGMENT
public void add(View v)
    {

            FragmentManager fm=getSupportFragmentManager();
            FragmentTransaction ft=fm.beginTransaction();
            ft.add(R.id.f1,new frag1());
            Toast.makeText(this, "Fragment is added!!!!!!", Toast.LENGTH_SHORT).show();
            ft.addToBackStack(null);
            ft.commit();
    }
It adds a fragment frag1() to the fragment layout which has id f1. Also, add this fragment to Backstack to maintain a record of added fragments.
2. TO DELETE A FRAGMENT
public void delete(View v)
    {

        FragmentManager fm=getSupportFragmentManager();
        FragmentTransaction ft=fm.beginTransaction();
        if(fm.getBackStackEntryCount()>0) {
            fm.popBackStack();
            Toast.makeText(this, "Fragment is deleted!!!!!!", Toast.LENGTH_SHORT).show();
        }

        ft.commit();
    }
It deletes one fragment which is on the top of the Stack.
3. TO REPLACE A FRAGMENT
public void replace(View v)
    {

        FragmentManager fm=getSupportFragmentManager();
        FragmentTransaction ft=fm.beginTransaction();
        ft.replace(R.id.f1,new frag2());
        Toast.makeText(this, "Fragment is replaced!!!!!!", Toast.LENGTH_SHORT).show();
        ft.addToBackStack(null);
        ft.commit();
    }
It replaces one fragment with another like fragment 2 is replaced with a fragment already placed on the layout of id f1.


This was a simple tutorial on how to add, delete and replace fragments in an Android Application.
You can access full code on GitHub by clicking on the below link and For any Query, Comment down below


